Table of Contents:
Learn More About Wood Slices
Lately, there’s been a big trend in wood slice crafts. It’s amazing to see what crafters and artists alike are making with these simple round wood discs. From putting them up on walls for a textured installation to cute Christmas tree ornaments, or other unique items in the home, the possibilities seem endless.
If you’d like to give wooden crafts a go, we hope these suggestions will get you started or give you the inspiration to make original wood slice art. We recommend you try Arteza Wood Slices since they come in three sizes, are pre-sanded and polished, and have pre-drilled holes. We even have a set that comes with jute twine to make hanging decorations or jewelry.
The Beauty of Wood
Its versatility means you can conceal the wood’s grain using a paint primer for an extra-strong, smooth surface or leave it as-is and your artwork takes on a completely different look and feel than what you draw or paint on paper or canvas.
Things to Make Out of Wood Slices

1. Holiday Decorations
A popular DIY use for wooden slices is custom holiday decorations. Whether it’s Halloween, Christmas, Thanksgiving, Valentine’s Day, Easter, or another special day of the year, turn your slices into ornaments to celebrate the season.
Whatever the holiday, there are lots of opportunities to use these wooden discs. Our artist created a cute holiday wreath depicting Santa’s reindeer, drawn and painted on the smallest slices.
Another adorable wood Christmas decoration idea is using them to make your own one-of-a-kind wood slice ornaments. Our artist drew faces of a penguin, a snowman, and Santa on separate discs and painted them with outdoor acrylic paint. Since they have pre-drilled holes, she threaded ribbon through each one for hanging on the tree.
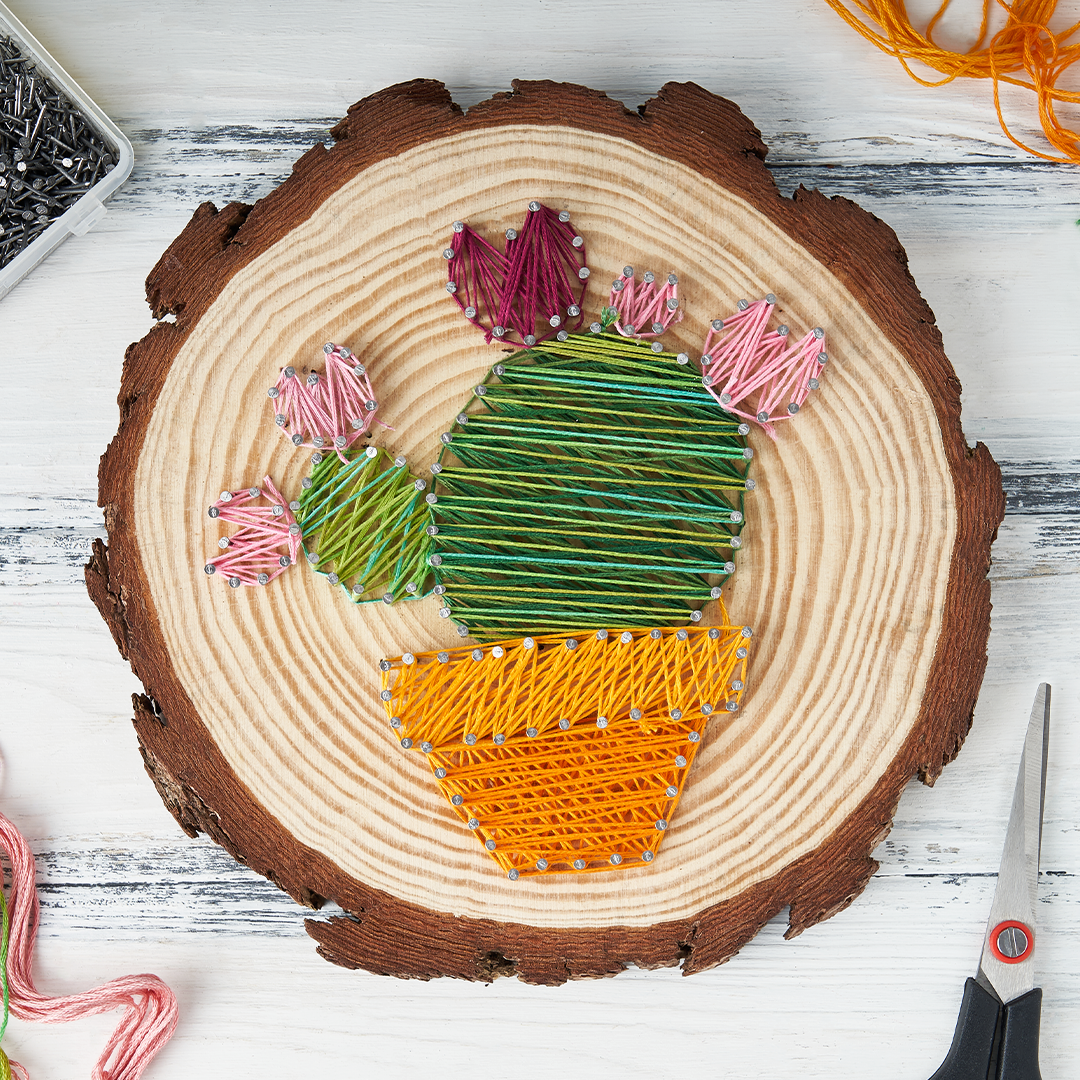
2. String Art
Wood slices are the perfect surface for creating string art. All you need are some nails, a hammer, and some string, thread, or yarn to make super-cute items for your home or for birthday or holiday gifts.

3. Special Occasion Decorations
Any time there’s a special event, you can use these slices to enhance the experience. Since they’re smooth enough to write on, use pens or markers on the small one to make place cards for the table next time you’re having a baby or bridal shower, or a special birthday or anniversary dinner. With their bark edges, they work well for rustic or outdoor-themed weddings.

4. Home Decor Items
Use them to make all kinds of things for your home. Lots of crafters have found that the smaller ones make the perfect drink coasters. Paint a picture on them or use glitter!
The medium size slices make great candle holders, especially when painted in a shade to match your candles or room’s decor. Other home decorating ideas include painting a larger slice with chalkboard paint for a handy message board in the kitchen. They are also wonderful for painting a landscape or another scene for original artwork hung in your home.

5. Painting and Lettering Crafts
Everyone needs a little encouragement from time to time. Use the slices to write inspirational messages that can be hung above a desk or in a work cubicle. If you don’t trust your handwriting, you can find lots of pretty fonts for free on the internet to trace. What about hand lettering a welcome message to hang on your front door or as a reminder to the kids to pick up their toys in the playroom?

6. Woodburning Crafts
Nothing complements wood slices better than using them for wood burning art and crafts. You can purchase a simple and safe wood burning kit and create beautiful images on them. After burning, seal them with varnish and they’ll retain their natural beauty. Use these as coasters, wall art, candle holders, or wood ornaments throughout your home.

7. Photo Props
Want to create the most unique backdrop for taking photos? Attach some slices in various sizes and in random patterns on a wall or sturdy structure and you have an interesting background for selfies, family photos, or product shots.
Tips and Recommendations
- Use glue or primer before painting on the slice; otherwise, your paint will be absorbed into the wood and your image will not be clear.
- To set your image, simply add a coat of clear varnish and let dry.
- Another way to set your image is to use wood polish. Make sure your paint or marker is completely dry before polishing.
- To keep your slice from warping or cracking, never place it near heat, on wet spots, or areas where the temperature will vary from extreme heat or cold.
- Using the largest size makes it easier for creating string art, as you will have more surface area to work with.
- With all the things you can do with these little wooden discs, it’s no wonder they’ve become so popular! We hope we’ve given you lots of helpful ideas for getting started making items for yourself or to give as gifts.

Comments
Leave a comment